> ## Documentation Index
> Fetch the complete documentation index at: https://docs.jsonify.com/llms.txt
> Use this file to discover all available pages before exploring further.
# Tutorial 5: Landing Page SEO Analyzer
> Automate basic SEO and content analysis for a list of landing pages obtained from Google search results.
This tutorial demonstrates how to build a workflow that performs a Google search for a specific query, then visits the top search results (landing pages) and analyzes them for basic SEO and content characteristics. You'll also learn how to schedule this workflow to run periodically.
## Goal
To analyze the top landing pages from Google search results for a given query, extracting elements like:
1. Company name.
2. Count of H1, H2, H3 tags.
3. Key phrases or keywords found on the page.
4. Presence of trust signals or specific UX elements.
5. Word count.
6. A general SEO-focused analysis or summary based on the content.
This workflow will be scheduled to run periodically (e.g., weekly or monthly).
## Key Blocks Used
* `Timer` (Trigger)
* `Google Search` (Input)
* `Find Links` (Transform)
* `Follow Links` (Input)
* `Interact with Page` (Transform)
* `Extract Data` (Transform - for analysis)
## What You'll Learn
* How to set up a scheduled workflow using the `Timer` block.
* How to process Google search results to identify and visit target landing pages.
* How to handle pop-ups and overlays to ensure clean data extraction.
* How to instruct the `Extract Data` block to perform analytical tasks and generate insights.
* Understanding basic Google search query refinement.
## Steps
### 1. Create a New Workflow
* Navigate to your Jsonify **Dashboard**.
* Click: **Create an empty workflow ➙ Extract**.
* The default `Open Websites` block and initial trigger will be modified or removed.
### 2. Add and Configure `Timer` Block (Trigger)
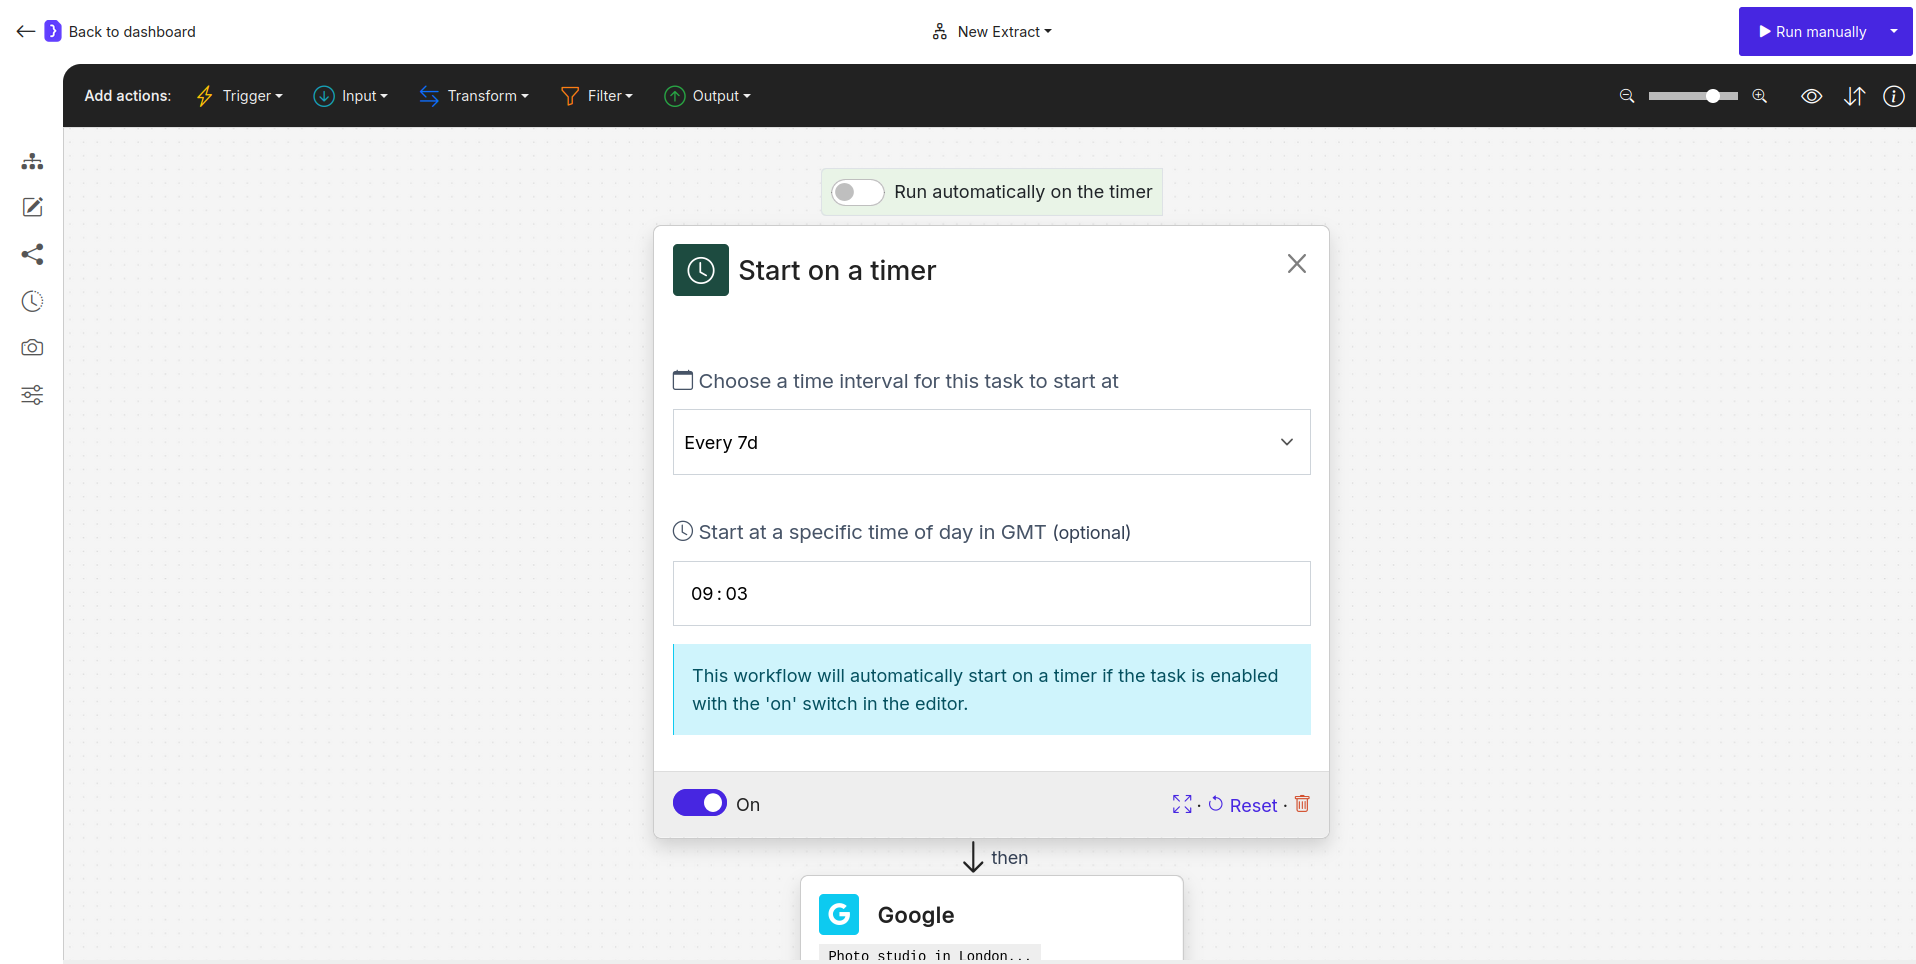
* We want this workflow to run periodically. First, to add the `Timer` trigger:
1. Look at the **block categories at the top of the editor** (Trigger, Input, Transform, Filter, Output).
2. Select the **Trigger** category.
3. From the dropdown list, select **`Timer`**.
4. Click the **+** icon on the canvas in the starting ("placeholder") position.
* Select the `Timer` block to configure it:
* **Choose a time interval for this task to start at:** Select your desired frequency, e.g., `Every 7d` (for weekly).
* **Start at a specific time of day in GMT (optional):** Set a time, e.g., `09:00`.
 ### 3. Remove Default `Open Websites` and Add `Google` Block
* Select the `Open Websites` block that came with the template. In the bottom right corner of its configuration panel, click **Delete**.
* Now, add the search functionality:
1. Look at the **block categories at the top of the editor**.
2. Select the **Input** category.
3. From the dropdown list, select **`Google`**.
4. Click the **+** icon on the canvas after the `Timer` block.
* Select the `Google` block to configure it:
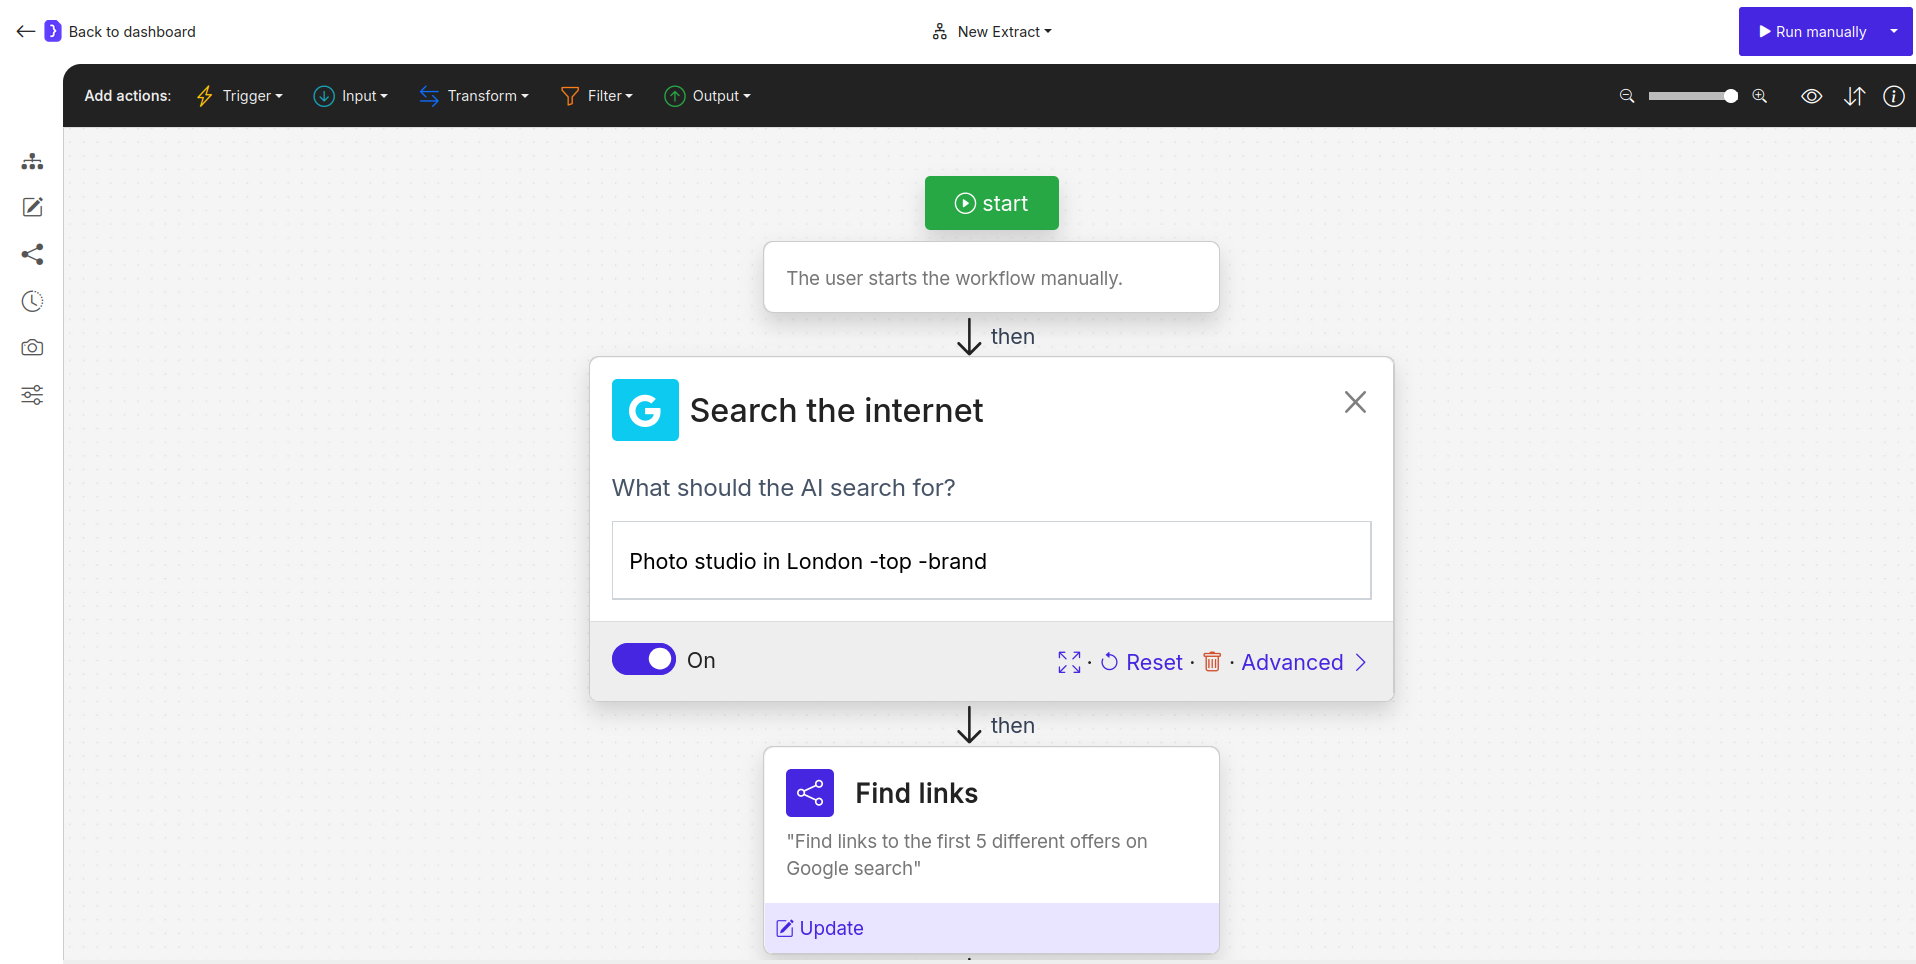
* **What should the AI search for?:** Enter your target query, e.g., `Photo studio in London -top -brand`.
* **Search Query Explanation:**
* `Photo studio in London`: This is the main search phrase.
* `-top -brand`: The minus sign (`-`) before a word or phrase tells Google to **exclude** results containing that specific word/phrase. This can help refine your search results.
### 3. Remove Default `Open Websites` and Add `Google` Block
* Select the `Open Websites` block that came with the template. In the bottom right corner of its configuration panel, click **Delete**.
* Now, add the search functionality:
1. Look at the **block categories at the top of the editor**.
2. Select the **Input** category.
3. From the dropdown list, select **`Google`**.
4. Click the **+** icon on the canvas after the `Timer` block.
* Select the `Google` block to configure it:
* **What should the AI search for?:** Enter your target query, e.g., `Photo studio in London -top -brand`.
* **Search Query Explanation:**
* `Photo studio in London`: This is the main search phrase.
* `-top -brand`: The minus sign (`-`) before a word or phrase tells Google to **exclude** results containing that specific word/phrase. This can help refine your search results.
 ### 4. Add and Configure `Find Links` Block
* From the Google search results page, we need to identify links to the actual landing pages.
* To add a new block:
1. Select the **Transform** category at the top of the editor.
2. From the dropdown list, select **`Find Links`**.
3. Click the **+** icon on the canvas after `Search on Google`.
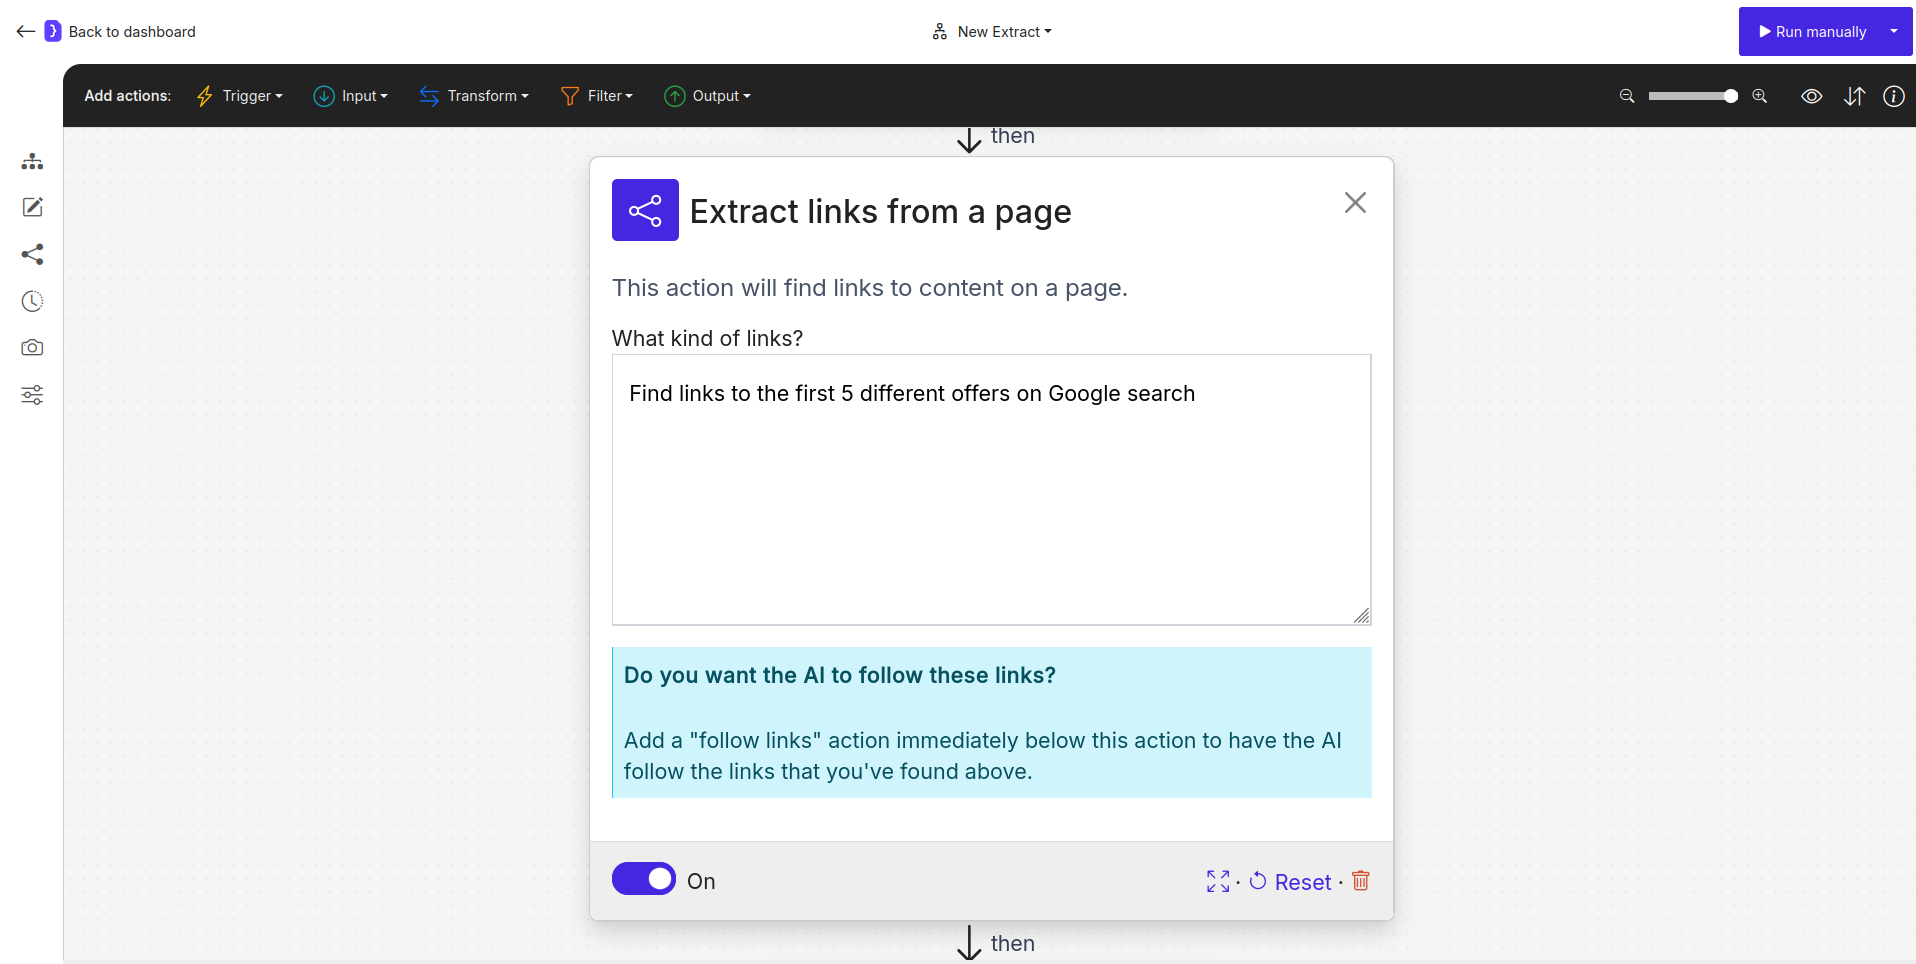
* Select the `Find Links` block.
* **What kind of links?:** `Find links to the first 5 different offers on Google search`.
### 4. Add and Configure `Find Links` Block
* From the Google search results page, we need to identify links to the actual landing pages.
* To add a new block:
1. Select the **Transform** category at the top of the editor.
2. From the dropdown list, select **`Find Links`**.
3. Click the **+** icon on the canvas after `Search on Google`.
* Select the `Find Links` block.
* **What kind of links?:** `Find links to the first 5 different offers on Google search`.
 ### 5. Add and Configure `Follow Links` Block
* The agent now needs to visit each of these 5 landing pages.
* To add a new block:
1. Select the **Input** category at the top of the editor.
2. From the dropdown list, select **`Follow Links`**.
3. Click the **+** icon on the canvas after `Find Links`.
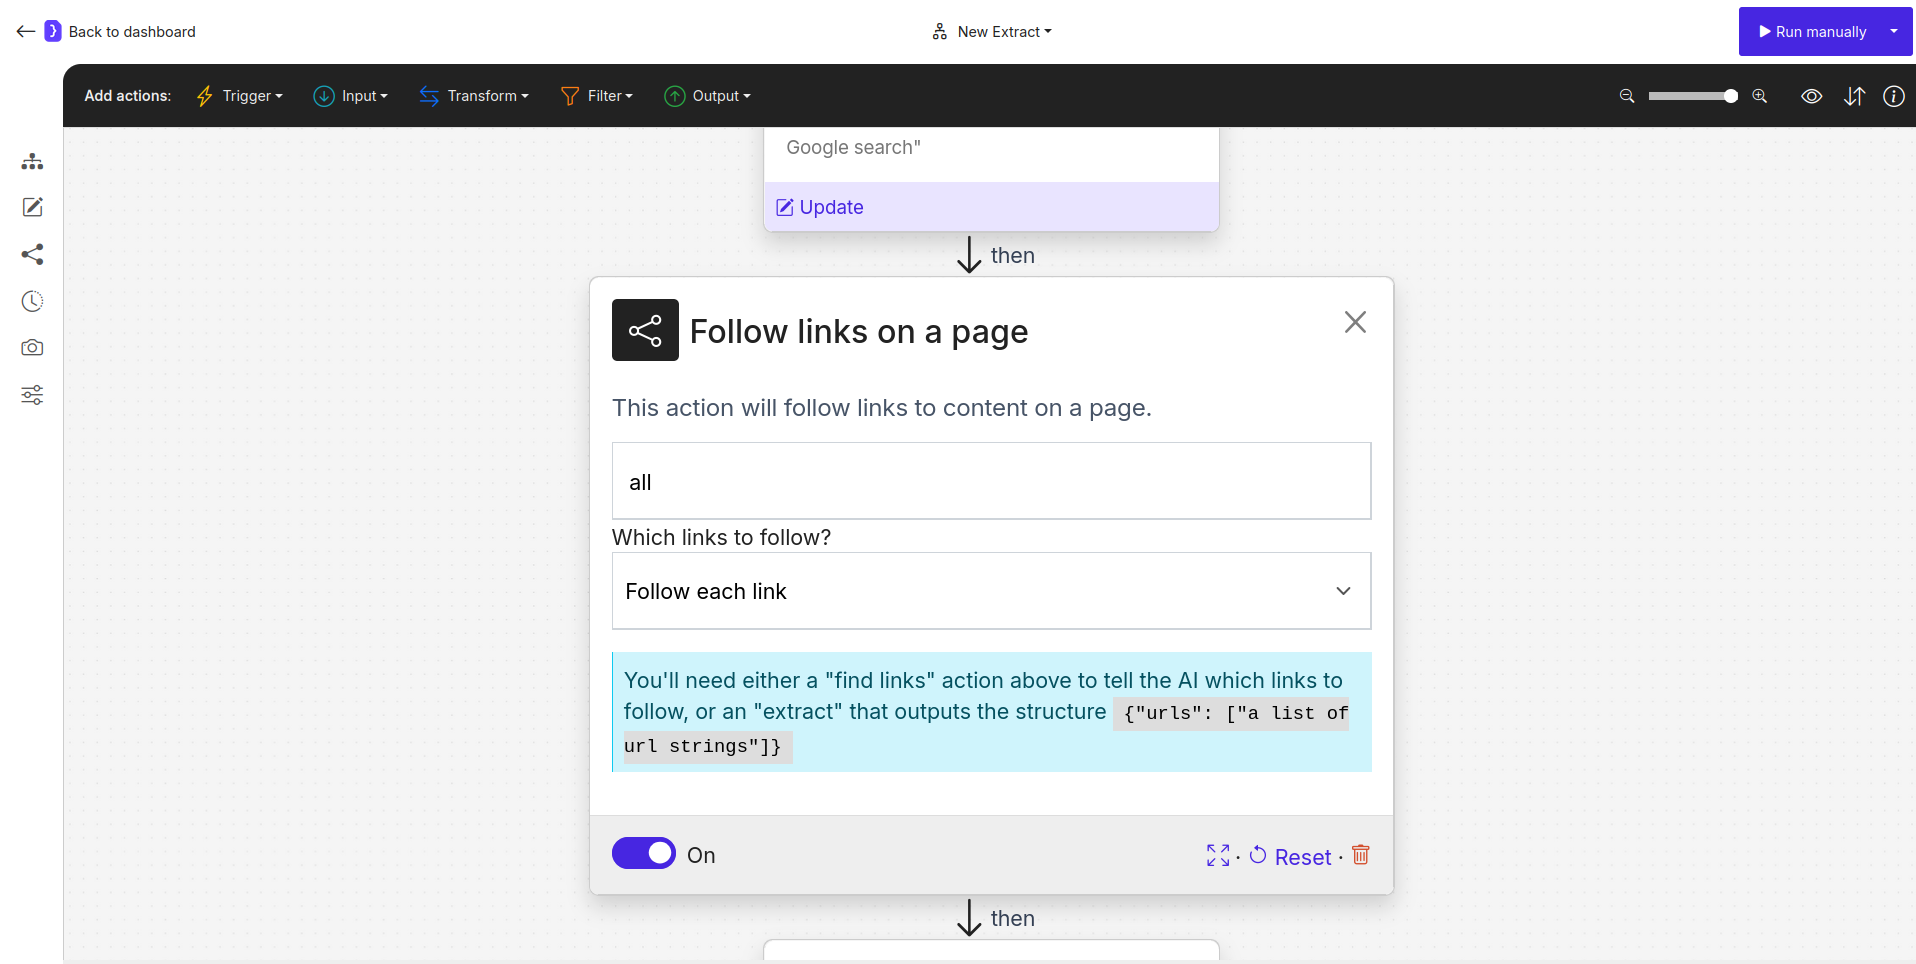
* Select the `Follow Links` block.
* **Which links to follow?:** Choose **`Follow each link`**.
### 5. Add and Configure `Follow Links` Block
* The agent now needs to visit each of these 5 landing pages.
* To add a new block:
1. Select the **Input** category at the top of the editor.
2. From the dropdown list, select **`Follow Links`**.
3. Click the **+** icon on the canvas after `Find Links`.
* Select the `Follow Links` block.
* **Which links to follow?:** Choose **`Follow each link`**.
 ### 6. Add `Interact with Page` to Handle Pop-ups
* Many websites show cookie banners or subscription pop-ups that can obscure content. We need to close these before analysis.
* To add a new block:
1. Select the **Transform** category at the top of the editor.
2. From the dropdown list, select **`Interact with Page`**.
3. Click the **+** icon on the canvas after the `Follow Links` block.
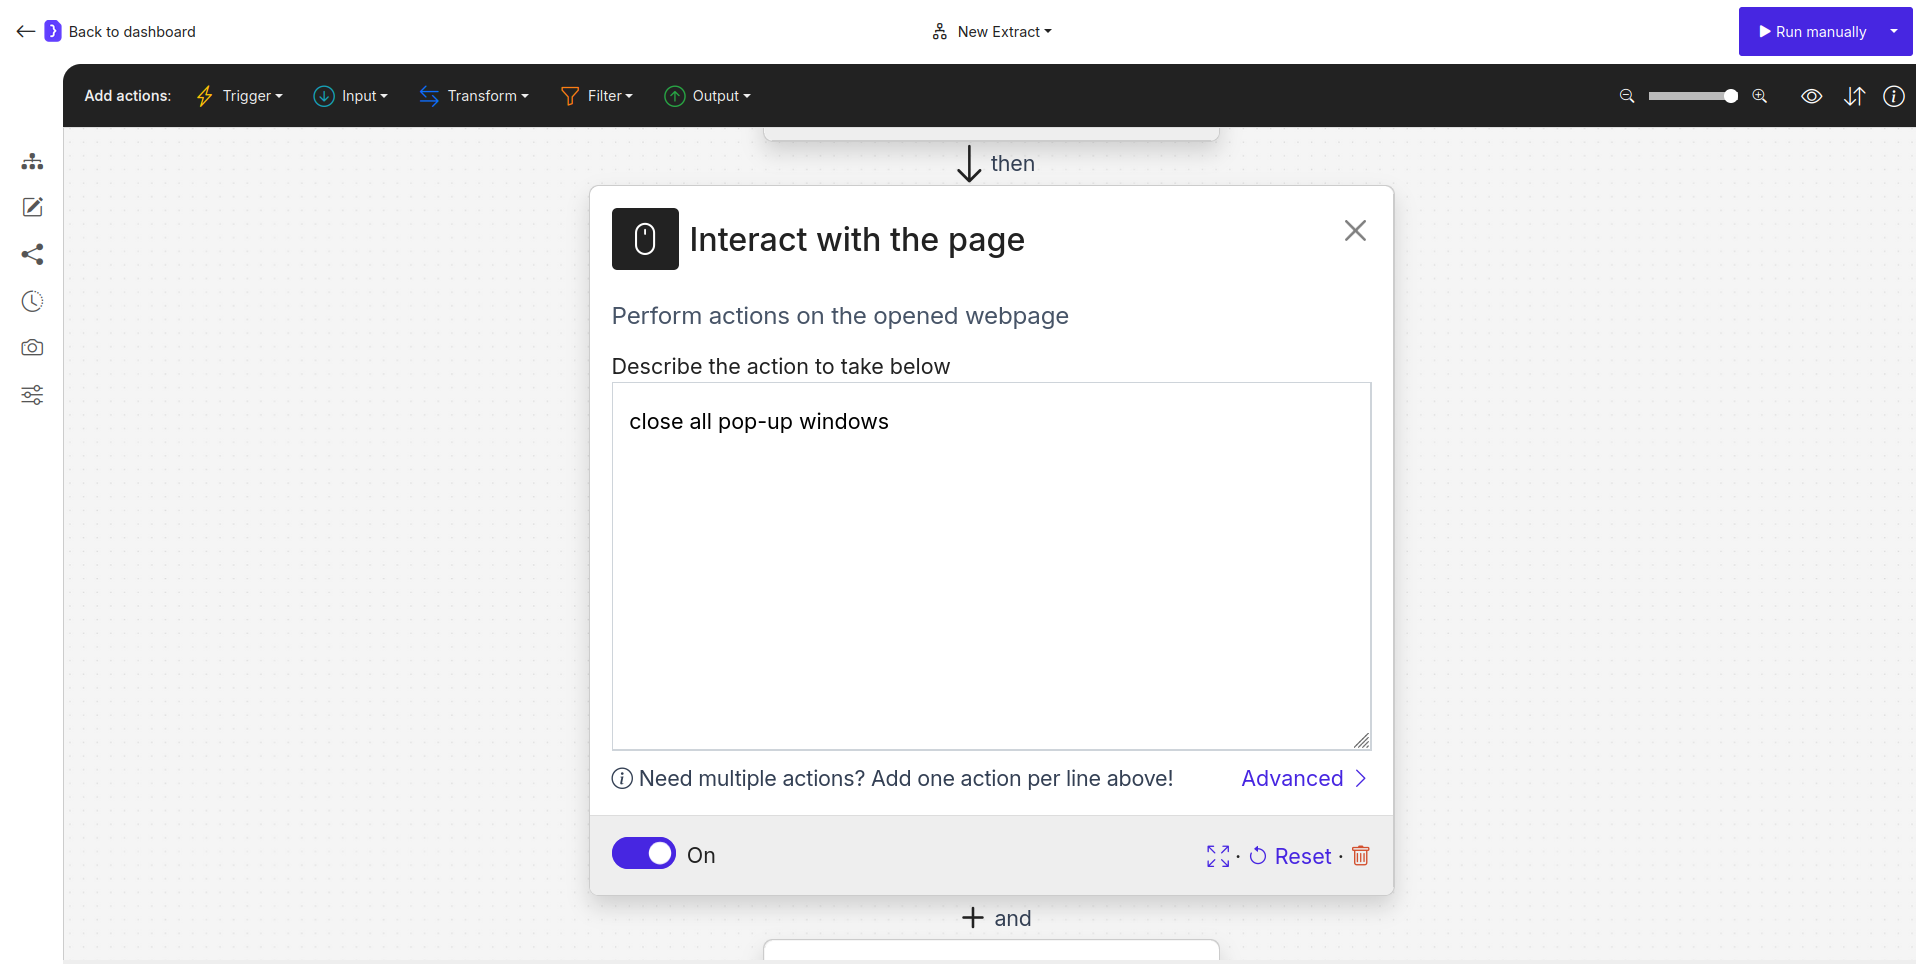
* Select the `Interact with Page` block to configure it.
* **Describe the action to take below:** Enter a clear instruction to handle common pop-ups. For example:
```
close all pop-up windows
```
* **Advanced Settings:** Click **Advanced** in the bottom right corner. Set **"Maximum number of steps"** to `3`. This allows the AI agent to perform up to three distinct actions (e.g., close a cookie banner, then close a newsletter pop-up, etc.) to clear the page before analysis. This number is an optimal assumption that there will be fewer than three pop-ups on the page.
### 6. Add `Interact with Page` to Handle Pop-ups
* Many websites show cookie banners or subscription pop-ups that can obscure content. We need to close these before analysis.
* To add a new block:
1. Select the **Transform** category at the top of the editor.
2. From the dropdown list, select **`Interact with Page`**.
3. Click the **+** icon on the canvas after the `Follow Links` block.
* Select the `Interact with Page` block to configure it.
* **Describe the action to take below:** Enter a clear instruction to handle common pop-ups. For example:
```
close all pop-up windows
```
* **Advanced Settings:** Click **Advanced** in the bottom right corner. Set **"Maximum number of steps"** to `3`. This allows the AI agent to perform up to three distinct actions (e.g., close a cookie banner, then close a newsletter pop-up, etc.) to clear the page before analysis. This number is an optimal assumption that there will be fewer than three pop-ups on the page.
 ### 7. Configure `Extract Data` Block (The Analysis Step)
* This block will execute on each of the 5 landing pages after the pop-ups have been handled.
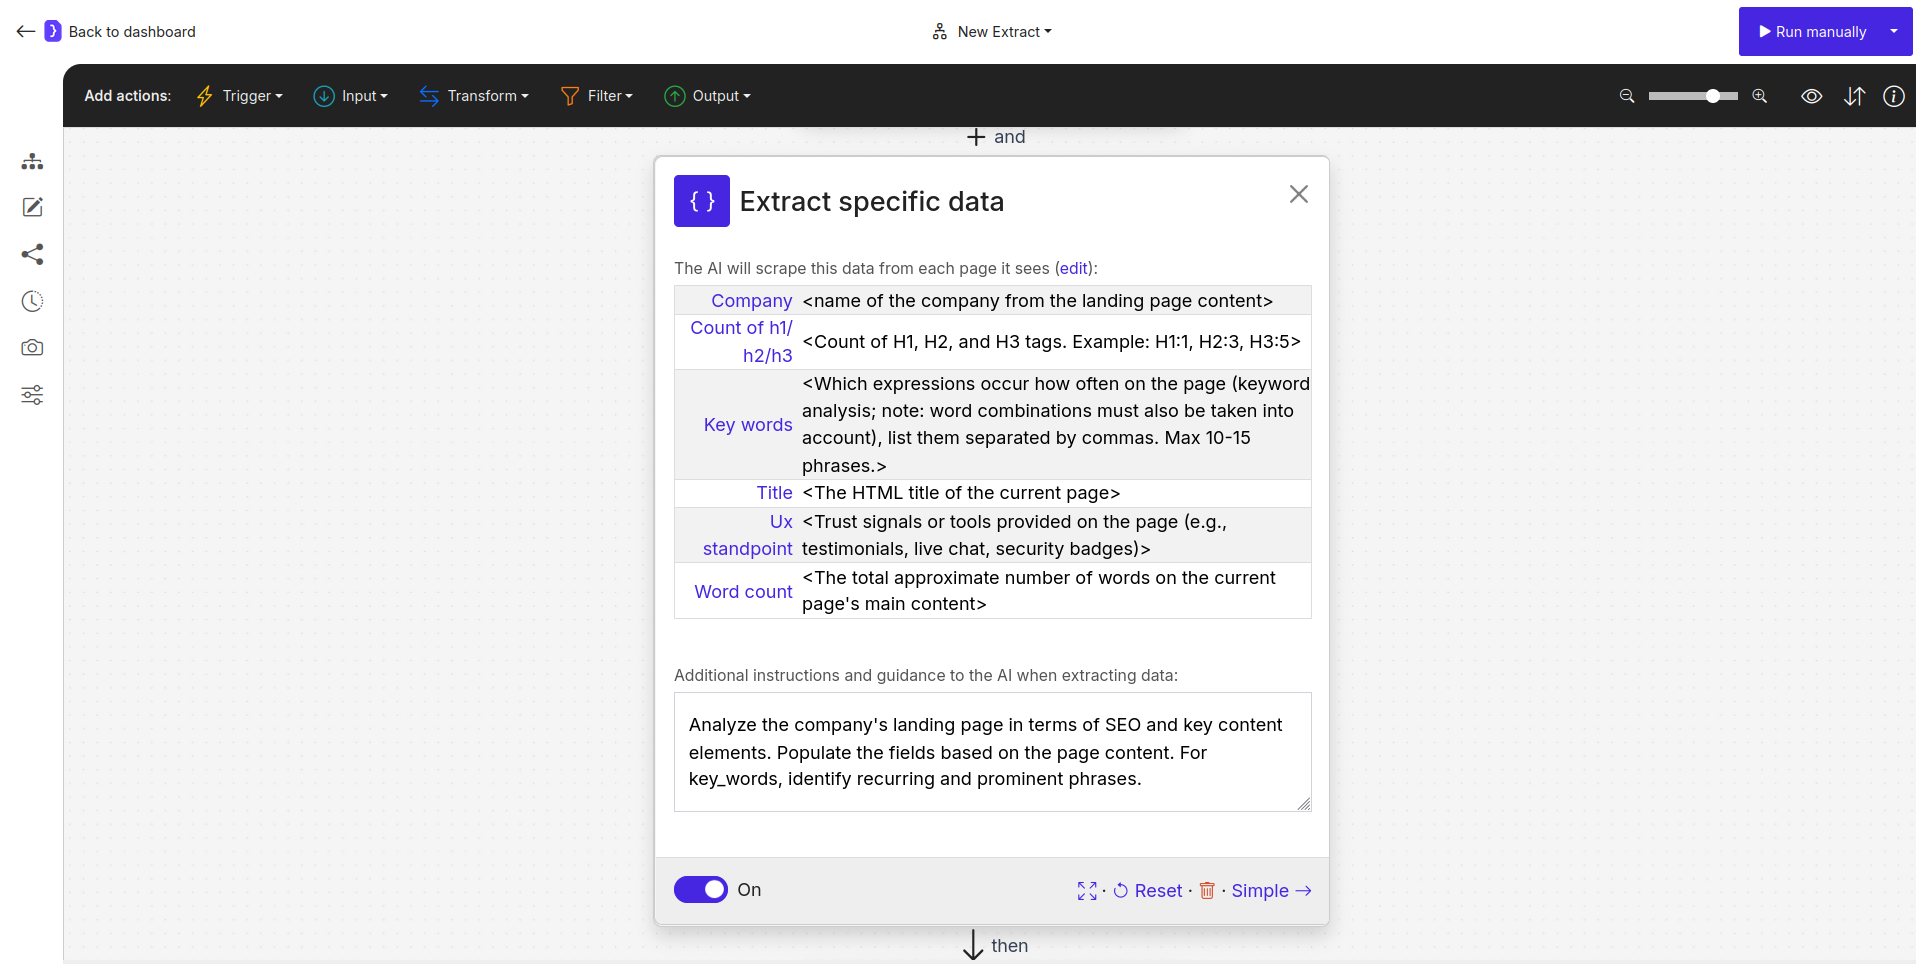
* Select the `Extract Data` block (it should be the last block, now connected after `Interact with Page`).
* **What information...?:** Select **`A single item`**.
* **Enter Advanced Mode (Edit data shape - JSON):** Click **Advanced** to switch to JSON mode.
* Enter the following JSON schema. The values `<...>` are prompts for the AI:
```json theme={null}
{
"company": "",
"count_of_h1/h2/h3": "",
"key_words": "",
"title": "",
"ux_standpoint": "",
"word_count": ""
}
```
* **Add additional instructions and guidance...:**
* `Analyze the company's landing page in terms of SEO and key content elements. Populate the fields based on the page content. For key_words, identify recurring and prominent phrases.`
### 7. Configure `Extract Data` Block (The Analysis Step)
* This block will execute on each of the 5 landing pages after the pop-ups have been handled.
* Select the `Extract Data` block (it should be the last block, now connected after `Interact with Page`).
* **What information...?:** Select **`A single item`**.
* **Enter Advanced Mode (Edit data shape - JSON):** Click **Advanced** to switch to JSON mode.
* Enter the following JSON schema. The values `<...>` are prompts for the AI:
```json theme={null}
{
"company": "",
"count_of_h1/h2/h3": "",
"key_words": "",
"title": "",
"ux_standpoint": "",
"word_count": ""
}
```
* **Add additional instructions and guidance...:**
* `Analyze the company's landing page in terms of SEO and key content elements. Populate the fields based on the page content. For key_words, identify recurring and prominent phrases.`
 ### 8. Run Your Workflow (Manually for Testing)
* Although scheduled, you can test it immediately. Click the **Run manually** button.
* The agent will:
1. Perform the Google search.
2. Identify the top 5 landing page links.
3. For each of these 5 pages:
a. Navigate to the page.
b. **Close any pop-ups found.**
c. Perform the analysis and extract the data according to your JSON schema.
### 9. Check the Results
* You will be redirected to the current run's page where results will populate.
* Once completed, click on **"View as sheet"**.
* You should see a table with 5 rows (one for each analyzed landing page), and columns corresponding to your JSON schema.
**Congratulations!** You've built a more robust workflow that can handle common website interruptions and periodically analyze top landing pages from search results.
### 8. Run Your Workflow (Manually for Testing)
* Although scheduled, you can test it immediately. Click the **Run manually** button.
* The agent will:
1. Perform the Google search.
2. Identify the top 5 landing page links.
3. For each of these 5 pages:
a. Navigate to the page.
b. **Close any pop-ups found.**
c. Perform the analysis and extract the data according to your JSON schema.
### 9. Check the Results
* You will be redirected to the current run's page where results will populate.
* Once completed, click on **"View as sheet"**.
* You should see a table with 5 rows (one for each analyzed landing page), and columns corresponding to your JSON schema.
**Congratulations!** You've built a more robust workflow that can handle common website interruptions and periodically analyze top landing pages from search results.